How to Wind & Set Your Rolex

Proper Care and Instructions for Each Model
Crown Positioning For Winding and Setting Your Rolex
Oyster Perpetual (No Date)
Pos. 1 – Wearing position:
The watch is equipped with a fully
screwed-down crown, ensuring complete protection for the movement. Once sealed,
the watch is ready to be worn, providing optimal safety and functionality.
Pos. 2 – Hand winding position:
To manually wind your watch, start by
unscrewing the crown counterclockwise until it is free from the screw threads.
Once it's in this position, turn the crown clockwise about 40 times in full
rotations. If the watch has been unworn for 1 or 2 days, it's essential to
rewind it to fully charge the movement and ensure proper functionality.
Pos. 3 – Time setting position:
Pull out the crown to the last notch. Adjust the time by moving the hands clockwise or counterclockwise. The second hand stops automatically and resumes when the crown is pushed back to Position 2 (not applicable for watches made before 1972). After setting the time, securely screw the crown back in to ensure the watch remains pressure-proof.

Watch Reference #: 1002, 1004, 1005, 1006, 1007, 1008, 1010, 1014, 1018, 1023, 1024, 1025, 1030, 1038, 114300, 116000, 116034, 176200, 176210, 176234, 177200, 177210, 177234, 6085, 6103, 6177, 6202, 6284, 6532, 6546, 6548, 6549, 6551, 6552, 6556, 6564, 6565, 6567, 6569, 6580, 6582, 6584, 6590, 6618, 6623, 6634, 6718, 6719, 6723, 6724, 67180, 67183, 67188, 67193, 67194, 67197, 67198, 67230, 67233, 67243, 76030, 76080, 76094, 76180, 76183, 76188, 76193, 76198, 76243, 77080, 77014, 77518, 14203, 14203M, 14208, 14208M, 14233, 14238

Air-King (No Date)
Watch Reference #: 14000, 14000M, 14010, 14010M, 114200, 114210, 114234, 116900, 5500, 5501, 5506, 5520, 6552
Pos. 1 – Wearing position:
The crown is fully screwed down, ensuring complete protection for the movement and making the watch ready to be worn. Experience the ultimate in watch sealing and wearability.
Pos. 2 – Hand winding position:
To wind the watch manually, unscrew the crown counterclockwise until it's free from the screw threads. The watch is ready for winding when the crown is in this position. Turn the crown clockwise approximately 40 full times. If the watch has not been worn for 1 or 2 days, it is necessary to rewind it to fully charge the movement and ensure proper functionality.
Pos. 3 – Time setting position:
Turn the crown to the last notch to begin. From there, you can adjust the time by moving the hands in either direction. The second hand will automatically stop and won't move until you push the crown back to Position 2 (unless your watch was made before 1972). Once you've set the time, screw the crown back in tightly to ensure the watch remains pressure-proof.
Air-King Date
Watch Reference #: 5700, 5701
Pos. 1 – Wearing position:
The crown is fully screwed-down, ensuring a tight seal for maximum movement protection. This watch is ready to be worn, providing optimal functionality and durability. Get your watch now for a reliable timepiece that will stand the test of time.
Pos. 2 – Hand winding position:
To wind your watch manually, first, unscrew the crown counterclockwise until it is free from the screw threads. Once in this position, turn the crown clockwise approximately 40 full times. This will fully charge the movement and ensure proper functioning, especially if the watch has not been worn for 1 or 2 days. Make sure to rewind the watch to guarantee optimal performance.
Pos. 3 – Date change position:
To set the date on your watch, pull the crown out to the last notch. Then, move the hands either clockwise or counterclockwise past the midnight position two times. The second hand will stop automatically and will only advance again when the crown is pushed back to Position 2 (this does not apply to watches made before 1972). This same position is used for setting the time.


Date & Datejust (Non-Quickset)
Watch Reference #: 1500, 1501, 1503, 1505, 1511, 1512, 1530, 1550, 1560, 1600, 1601, 1603, 1607, 1625, 1630, 5075, 6075, 6305, 6335, 6516, 6517, 6518, 6519, 6534, 6604, 6605, 6627, 6824, 6827, 6916, 6917, 6927, 6919
Pos. 1 – Wearing position:
The watch is sealed tight with a fully screwed-down crown, ensuring complete protection for the movement. It's ready to be worn, offering optimal functionality and reliability. Experience the assurance of a securely sealed timepiece for your peace of mind.
Pos. 2 – Hand winding position:
To manually wind your watch, start by unscrewing the crown counterclockwise until it is free of the screw threads. Once in this position, turn the crown clockwise about 40 times to fully charge the movement. It is important to rewind the watch if it has not been worn for 1 or 2 days to ensure proper functioning and optimal performance.
Pos. 3 – Date change position:
To set the date, pull the crown out to the last notch. Then, move the hands either clockwise or counterclockwise past the midnight position two times. The second hand will stop automatically and won't move again until the crown is pushed back to Position 2 (applies to watches produced after 1972). This is also the position for setting the time. Follow these steps for easy watch adjustment.
Pos. 4 – Time setting position:
To adjust the date and time on your watch, follow these steps. First, pull out the crown to the last notch. This is the same position for setting the date. To set the time, move the hands either clockwise or counterclockwise. The second hand will stop automatically and won't move until you push the crown back to Position 2 (applies to watches produced after 1972). Once you've set the time and date, make sure to screw the crown back tightly to ensure the watch is pressure-proof once again. This simple process allows you to easily adjust your watch's settings for optimal use.
Date & Datejust (Quickset)
Pos. 1 – Wearing position:
The crown is fully screwed down, ensuring a tight seal and complete protection for the movement of the watch. It's now ready to be worn, offering optimal performance and reliability.
Pos. 2 – Hand winding position:
To wind your watch manually, unscrew the crown counterclockwise until it is free of the screw threads. Once in this position, turn the crown clockwise around 40 times to fully charge the movement and ensure proper functioning. If the watch has not been worn for 1 or 2 days, it is recommended to rewind it for optimal performance.
Pos. 3 – Date change position:
The crown is pulled out to the first notch, allowing for quick date adjustment by turning it clockwise (for ladies) or counterclockwise (for men). Stay in control of your timepiece with this convenient feature.
Pos. 4 – Time setting position:
To set the time on your watch, start by pulling out the crown to the last notch. You can then adjust the time by moving the hands either clockwise or counterclockwise. Please note that the second hand will stop automatically and will only resume once the crown is pushed back to Position 2. Once you have set the time and date, make sure to securely screw the crown back in to ensure the watch remains pressure-proof.

Watch Reference #: 115200, 115210, 115234, 116135, 116138, 116139, 116185, 116188, 116189, 116199, 116200, 116201, 116203, 116208, 116231, 116233, 116234, 116238, 116243, 116244, 116261, 116263, 116264, 116285, 116300, 116333, 116334, 126200, 126201, 126233, 126234, 126281, 126283, 126284, 15000, 15010, 15037, 15038, 15053, 15200, 15203, 15210, 15223, 15238, 15505, 16000, 16013, 16014, 16018, 16030, 16078, 16200, 16203, 16220, 16233, 16234, 16238, 16248, 16250, 16253, 16263, 16264, 178158, 178159, 178238, 178239, 178240, 178241, 178243, 178245, 178246, 178248, 178269, 178271, 178273, 178274, 178275, 178278, 178279, 178286, 178288, 178296, 178288, 178313, 178341, 178343, 178344, 178383, 178384, 179136, 179138, 179158, 179159, 179160, 179161, 179163, 179165, 179166, 179171, 179173, 179174, 179175, 179178, 179179, 179238, 179239, 179296, 179313, 179383, 179384, 179458, 179459, 278243, 278271, 278273, 278275, 278278, 278285, 278288, 278289, 278341, 278343, 278381, 278383, 279135, 279136, 279138, 279160, 279161, 279163, 279165, 279166, 279171, 279173, 279174, 279178, 279381, 279383, 279384, 68158, 68159, 68238, 68240, 68243, 68246, 68248, 68258, 68266, 68268, 68273, 68274, 68278, 68279, 68286, 68288, 68289, 69138, 69158, 69160, 69163, 69173, 69174, 69178, 69179, 69190, 69240, 69278, 69279, 69318, 69319, 69328, 69329, 69359, 78240, 78243, 78246, 78248, 78273, 78274, 78278, 78279, 78286, 78288, 79160, 79163, 79168, 79173, 79174, 79178, 79179, 79190, 79240, 80298, 80299, 80308, 80309, 80315, 80318, 80319, 80339, 80359, 81158, 81159, 81208, 81209, 81285, 81298, 81299, 81308, 81318, 81319, 81338, 81339, 81348, 81349, 86348, 86349

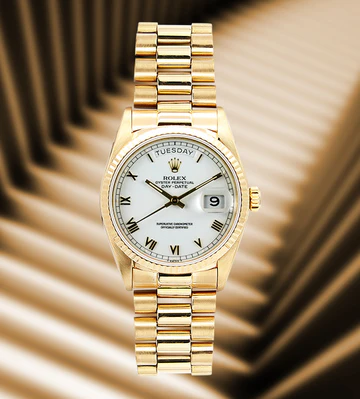
Day-Date (Non-Quickset)
Watch Reference #: 1802, 1803, 1804, 1806, 1807, 1808, 1809, 1810, 1811, 1812, 1813, 1814, 1815, 1831, 6511, 6611
Pos. 1 – Wearing position:
The crown is fully screwed down, ensuring complete protection for the movement and making the watch ready to wear.
Pos. 2 – Hand winding position:
To unscrew the crown, turn it counterclockwise until it is no longer threaded. Once in this position, the watch is ready for manual hand winding. Rotate the crown clockwise approximately 40 full times. If the watch has not been worn for 1 or 2 days, it is necessary to rewind it to fully charge the movement and ensure proper functioning.
Pos. 3 – Day and Date change position:
To set both the day of the week and the date, start by pulling out the crown to the last notch. Begin with adjusting the date by moving the hands clockwise past the midnight position twice. Once the date is set, proceed to set the day of the week by moving the hands counterclockwise past the midnight position twice. The second hand will stop automatically and will not move until the crown is pushed back to Position 2 (this does not apply to watches made before 1972). This is also the same position used for setting the time.
Pos. 4 – Time setting position:
The crown should be pulled out to the last notch, which is the position for setting the date. To set the time, move the hands either clockwise or counterclockwise. The second hand will automatically stop and will not advance until the crown is pushed back to Position 2 (except for watches produced before 1972). After setting the time and date, tightly screw the crown back in to ensure the watch remains pressure-proof.
Day-Date (Single Quickset)
Watch Reference #: 18026, 18028, 18029, 18038, 18039, 18046, 18049, 18078, 18079
Pos. 1 – Wearing position:
The crown is fully screwed down, ensuring complete protection for the movement and making the watch ready to wear. With this position, the watch is sealed tight, providing optimal security. Get ready to wear a watch that offers maximum protection and functionality with its fully screwed-down crown.
Pos. 2 – Hand winding position:
To wind your watch manually, unscrew the crown counterclockwise until it is free from the screw threads. Once in this position, turn the crown clockwise approximately 40 full times. If your watch has not been worn for 1 or 2 days, it is recommended to rewind it to ensure the movement is fully charged and the watch runs properly.
Pos. 3 – Date change position:
The crown is pulled out to the first notch, allowing for quick date adjustment by turning it counterclockwise.
Pos. 4 – Day change position:
To set the day of the week, carefully pull out the crown to the last notch. Then, move the hands counterclockwise past the midnight position twice. The second hand will stop automatically and will not move until the crown is pushed back to Position 2. Remember, this is also the same position for setting the time.
Pos. 5 – Time setting position:
Fully extend the crown to its furthest notch. This places the watch in time-setting mode, allowing you to adjust the hands in either a clockwise or counterclockwise direction. The second hand will stop automatically and remain stationary until you push the crown back to Position 2. Once you have set the time and date, securely screw the crown back in to ensure the watch maintains its pressure-proof seal.

Day-Date (Double Quickset)
Pos. 1 – Wearing position:
The watch is securely sealed with a fully screwed-down crown, ensuring complete protection for the movement. It is now ready to be worn, providing optimal functionality and peace of mind.
Pos. 2 – Hand winding position:
To manually wind your watch, unscrew the crown counterclockwise until it is free from the screw threads. Rotate the crown clockwise approximately 40 full times. If your watch has not been worn for 1 or 2 days, it is recommended to rewind it to fully charge the movement and ensure proper functioning.
Pos. 3 – Day and Date change position:
To quickly set both the date and the day of the week, pull out the crown to the first notch. Turn the crown clockwise to set the date and counterclockwise to set the day of the week. Streamline your timepiece adjustments with this convenient feature.
Pos. 4 – Time setting position:
To set the time on your watch, start by pulling out the crown to the last notch. This will allow you to adjust the hands by moving them either clockwise or counterclockwise. Keep in mind that the second hand will stop automatically and will only resume once you push the crown back to Position 2. Once you have set the time and date, make sure to screw the crown back in tightly to ensure the watch remains pressure-proof.
Watch Reference #: 118135, 118138, 118139, 118205, 118206, 118208, 118209, 118235, 118238, 118239, 118296, 118338, 118339, 118346, 118348, 118366, 118388, 118389, 118395, 118398, 118399, 128235, 128238, 128239, 128345, 128348, 128349, 18206, 18208, 18238, 18239, 18248, 18249, 18296, 18308, 18338, 18346, 18348, 18349, 18366, 18368, 18378, 18388, 18389, 18946, 18948, 18956, 18958, 218206, 218235, 218238, 218239, 218348, 218349, 218398, 218399, 228206, 228235, 228238, 228239, 228345, 228348, 228349, 228396, 228398
Submariner (No Date)
Watch Reference #: 5508, 5512, 5513, 5514, 5517, 6200, 6204, 6205, 6536, 6538, 6538A, 14060, 14060M, 114060
Pos. 1 – Wearing position:
When the crown is fully screwed down, the watch is securely sealed, offering complete protection for the movement. It is now ready to be worn, ensuring optimal performance and durability.
Pos. 2 – Hand winding position:
To unscrew the crown, turn it counterclockwise until it is completely free from the screw threads. Once in this position, the watch is ready for manual hand winding. Simply turn the crown clockwise approximately 40 full times. If the watch has not been worn for 1 or 2 days, it is necessary to rewind it to ensure that the movement is fully charged and the watch runs properly.
Pos. 3 – Time setting position:
To set the time, start by pulling the crown out to the last notch. This allows you to adjust the hands either clockwise or counterclockwise. Keep in mind that the second hand will stop automatically and will only start moving again when you push the crown back to Position 2 (this doesn't apply to watches made before 1972). Once you've set the time, make sure to screw the crown back in tightly to ensure the watch remains pressure-proof.


Submariner Date (Quickset)
Watch Reference #: 16800, 168000, 16610, 16613, 16613T, 16618, 16803, 16808, 116610, 116613, 116618, 116619
Pos. 1 – Wearing position:
The watch is fully equipped with a screwed-down crown, ensuring complete protection for the movement. With the watch securely sealed, it is ready to be worn and enjoyed.
Pos. 2 – Hand winding position:
To wind your watch manually, unscrew the crown counterclockwise until it is free from the screw threads. Once in this position, turn the crown clockwise approximately 40 full times. If the watch has not been worn for 1 or 2 days, it is necessary to rewind it to ensure the movement is fully charged and guarantee proper functioning. Keep your watch running smoothly with these simple steps!
Pos. 3 – Date change position:
Pull the crown out to the first notch to easily set the date by turning it clockwise.
Pos. 4 – Time setting position:
Fully extend the crown to its last notch. This will allow you to adjust the time by moving the hands in either a clockwise or counterclockwise direction. The second hand will stop automatically and will not move until you push the crown back to Position 2. Once you have set the time and date, securely screw the crown back in place to restore the watch's pressure-proof seal.
Sea-Dweller & Deepsea (Quickset)
Watch Reference #: 116600, 116660, 16600, 16660, 126600, 126603, 126660
Pos. 1 – Wearing position:
With the crown fully screwed down, the watch is sealed tight, offering complete protection for the movement. Ready to wear!
Pos. 2 – Hand winding position:
Unscrew the crown counterclockwise until it is free of the screw threads. In this position, the watch is ready for manual hand winding. Turn the crown clockwise approximately 40 times. If the watch has not been worn for 1 or 2 days, rewind it to fully charge the movement and ensure proper functioning.
Pos. 3 – Date change position:
Pull the crown to the first notch to quickly set the date by turning it clockwise.
Pos. 4 – Time setting position:
Pull the crown to the last notch. Adjust the time by moving the hands clockwise or counterclockwise. The second hand stops automatically and resumes when the crown is pushed back to Position 2. After setting the time and date, screw the crown tightly to ensure the watch is pressure-proof again.


Gmt-Master (Non-Quickset)
Watch Reference #: 1675, 6542
Pos. 1 – Wearing position:
The watch's crown is fully screwed down, ensuring complete protection for the movement. With this secure seal, the watch is ready to be worn and enjoyed.
Pos. 2 – Hand winding position:
To remove the crown, turn it counterclockwise until it is free from the screw threads. Once in this position, the watch is ready for manual hand winding. Simply turn the crown clockwise approximately 40 full times. If the watch hasn't been worn for 1 or 2 days, rewinding is necessary to fully charge the movement and ensure proper functioning.
Pos. 3 – Date change position:
To set the date, pull the crown out to the last notch. Then, move the hands past the midnight position twice, either clockwise or counterclockwise. The second hand will automatically stop and will only advance again when the crown is pushed back to Position 2 (applies to watches produced after 1972). This same position is also used for setting the time.
Gmt-Master (Quickset)
Watch Reference #: 16700, 16713, 16750, 16753, 16758
Pos. 1 – Wearing position:
The watch features a fully screwed-down crown, ensuring complete protection for the movement. With this position, the watch is securely sealed and ready to be worn, providing optimal functionality and durability.
Pos. 2 – Hand winding position:
To wind your watch manually, unscrew the crown counterclockwise until it's free from the screw threads. This position indicates that your watch is ready for winding. Rotate the crown clockwise approximately 40 times to fully charge the movement and ensure proper functionality. If your watch has been idle for 1 or 2 days, it's recommended to rewind it to guarantee optimal performance and power reserve.
Pos. 3 – Date change position:
Pull the crown out to the first notch for quickly setting the date by turning it clockwise or counterclockwise (depending on the model).
Pos. 4 – Time setting position:
To set the time, pull the crown out to the last notch. You can adjust the time by moving the hands in either a clockwise or counterclockwise direction. The second hand will stop automatically and will resume ticking only when you push the crown back to Position 2. Once you have set the time and date, make sure to screw the crown back in tightly to ensure the watch remains pressure-proof.


Gmt-Master II
Watch Reference #: 16710, 16713, 16718, 16760, 116710, 116713, 116718, 116719, 116758, 116759, 126710, 126711, 126715, 126719
Pos. 1 – Wearing position:
The watch is fully protected with a tightly screwed-down crown, ensuring the movement's safety. It is ready to be worn, providing optimal security and functionality.
Pos. 2 – Hand winding position:
To wind your watch manually, unscrew the crown counterclockwise until it is free of the screw threads. Once in this position, turn the crown clockwise approximately 40 full times. If your watch has not been worn for 1 or 2 days, it's important to rewind it to fully charge the movement and ensure proper functionality.
Pos. 3 – Hour hand change position:
To adjust the hour rapidly, pull out the crown to the first notch and turn it clockwise or counterclockwise in one-hour increments. The watch will continue to function correctly during this process. The same position is used for quickly setting the date. Experience convenient time adjustments with ease!
Pos. 4 – Time setting position:
Fully extend the crown to its furthest position. This will allow you to adjust the time by moving the hands in either a clockwise or counterclockwise direction. The second hand will stop automatically and will only resume once the crown is returned to Position 2. After setting the time and date, securely screw the crown back in to ensure the watch remains resistant to pressure.
Yacht-Master & Yacht-Master II
Watch Reference #: 16622, 16623, 16628, 68623, 68628, 69623, 69628, 116680, 116681, 116688, 116689, 126621, 126622, 126655, 168622, 168623, 168628, 169622, 169623, 169628, 116622, 116623, 116628, 116655, 226659, 268621, 268622, 268655
Pos. 1 – Wearing position:
The watch is equipped with a fully screwed-down crown, ensuring complete protection for the movement. With this feature, the watch is securely sealed and ready to be worn.
Pos. 2 – Hand winding position:
To manually wind your watch, start by unscrewing the crown counterclockwise until it is free from the screw threads. Once in this position, turn the crown clockwise around 40 times to ensure the movement is fully charged and the watch runs properly. If the watch has not been worn for 1 or 2 days, it is recommended to rewind it. This will optimize its performance and guarantee accurate timekeeping.
Pos. 3 – Date change position:
Pull the crown out to the first notch to easily set the date by turning it clockwise.
Pos. 4 – Time setting position:
To set the time on your watch, start by pulling out the crown to the last notch. This will put the watch in the position for adjusting the time. You can move the hands either clockwise or counterclockwise to set the desired time. Keep in mind that the second hand will stop automatically and won't move until you push the crown back to Position 2. Once you have set the time and date, make sure to screw the crown back in tightly to ensure the watch remains pressure-proof.


Explorer II (Quickset)
Watch Reference #: 16550, 16570, 216570
Pos. 1 – Wearing position:
The watch is equipped with a fully screwed-down crown, ensuring a tight seal for maximum movement protection. It is now ready to be worn, offering optimal functionality and durability.
Pos. 2 – Hand winding position:
Unscrew the crown counterclockwise until it is free of the screw threads. In this position, the watch is ready for manual hand winding. Turn the crown clockwise approximately 40 times. If the watch has not been worn for 1 or 2 days, rewind it to fully charge the movement and ensure proper functioning.
Pos. 3 – Hour hand change position:
To adjust the time rapidly, pull out the crown to the first notch. You can then change the hour in one-hour increments by turning the crown clockwise or counterclockwise. The watch will continue to function correctly during this process. This is also the same position for setting the date quickly.
Pos. 4 – Date change position:
When adjusting the date, start by pulling the crown out to the first notch. This will put the watch in a position where you can quickly change the date by moving the hour hand in one-hour increments, bypassing the midnight position twice. Rest assured, the watch will continue to function properly throughout this process. Keep your timepiece running smoothly with these simple steps!
Pos. 5 – Time setting position:
To set the time on your watch, pull out the crown to the last notch. You can adjust the time by moving the hands clockwise or counterclockwise. The second hand will stop automatically and resume once you push the crown back to Position 2. After setting the time and date, make sure to screw the crown tightly to maintain the watch's pressure-proof feature.
Cosmograph Daytona (Automatic)
Watch Reference #: 16518, 16519, 16520, 16523, 16528, 16568, 116500, 116503, 116505, 116506, 116508, 116509, 116515, 116518, 116519, 116520, 116523, 116528, 116568, 116576, 116589, 116598, 116599
Pos. 1 – Wearing position:
The crown is fully screwed down, ensuring complete protection for the movement. The watch is now ready to be worn, offering optimal functionality and security.
Pos. 2 – Hand winding position:
To manually wind your watch, begin by unscrewing the crown counterclockwise until it is detached from the screw threads. Once in this position, rotate the crown clockwise about 40 complete revolutions. If your watch has been inactive for 1 or 2 days, it is crucial to rewind it to ensure the movement is fully charged and the watch operates smoothly. Follow these easy steps for effortless watch winding and optimal performance.
Pos. 3 – Time setting position:
To set the time on your watch, begin by pulling out the crown to the last notch. You can then adjust the time by moving the hands either clockwise or counterclockwise. The second hand will automatically pause and resume once you push the crown back to Position 2. After setting the time, remember to securely screw the crown back in to maintain the watch's pressure-proof feature. Follow these simple steps for seamless time adjustment on your watch.


Measuring Elapsed Time
Pos. 1 – Wearing position:
The watch features fully screwed-down push buttons, ensuring the movement is fully protected and the watch is securely sealed. Get ready to wear this timepiece with confidence.
Pos. 2 – Operational push buttons position:
To operate the chronograph on your watch, follow these simple steps. First, unscrew the push buttons counterclockwise until they are free of the screw threads. Once in this position, you can start, stop, or restart the chronograph hand and totalisers by pressing the upper push button. To reset the chronograph second hand and totalisers to zero, depress the lower push button. The chronograph second hand indicates elapsed seconds to 1/5th of a second, while the minutes and hours can be read from the totalisers. After using the chronograph, make sure to screw down all push buttons tightly to restore the watch's pressure-proofing.
Calculating Average Speed
Pos. 1 – Wearing position:
The push buttons are fully screwed down, ensuring a tight seal and complete protection for the watch movement. Now, you can wear the watch with confidence.
Pos. 2 – Operational push buttons position:
To unscrew the push buttons, turn them counterclockwise until they are free from the screw threads. Make sure the chronograph second hand is set to zero in this position. To start the timing sequence, press the upper push button. Once the predetermined distance is covered, press the upper button again. The second hand will stop, indicating the average speed on the bezel. Finally, tightly screw down all push buttons to restore the watch's pressure-proofing.